 ACNH Resource Guide: Make Rocks, Fossils & More Spawn Where You Want
Want to collect key resources in Animal Crossing: New Horizons quickly and efficiently every day? This guide details four "fixed-point" techniques to manipulate the game's spawning mechanics, ensuring that ore, fossils, furniture, and message bottles appear in your chosen locations daily, dramatically boosting your island management efficiency!
Core Principle: Control Spawns, Collect on Target
Most daily resources (ore, fossils, bottles, etc.) spawn randomly on eligible, empty tiles. The core trick is to use "Transparent Custom Designs" or non-spawnable items (like buildings, structures) to cover all tiles where you don't want resources, leaving only your desired spots open. This forces the game's spawning system to place resources precisely where you've planned.
1. Creating a Fixed Ore Farm (The Efficient Rock Garden)
Principle: Your island can have up to 6 rocks. Each rock can yield up to 8 materials (clay, stone, iron nuggets, gold nuggets) when hit. By controlling where rocks respawn, you can not only group them together for easy management but also set up an optimal hitting environment (preventing knockback) for maximum yield.
Preparation:
Understand the Key Mechanic: In-game, eating any fruit grants your character "power". Your next tool strike will have a "full-strength" effect, allowing you to destroy a rock or fell a tree in one hit. The goal here is to destroy rocks to make them respawn elsewhere, not to harvest them. (Note: This process will temporarily cut off your daily ore supply. If you're in urgent need of materials like Iron Nuggets for construction projects, you might consider obtaining them quickly through reliable channels. For instance, you can browse the ACNH Materials Shop to replenish your stock.)
Clear Existing Rocks: Eat a fruit, then use a shovel or axe to shatter (not hit) all existing rocks in undesirable locations.
Prepare "Transparent Custom Designs" (create one in your NookPhone's Custom Designs app, fill it completely transparent, and select it in the "Island Designer" app's path tool).
Steps:
1.Plan Your Rock Garden
Choose an open area and plan the layout for your 6 rock spawn points (e.g., in a row or grid). Ensure each spawn point has all 8 surrounding tiles free of rivers, cliffs, buildings, or other obstructions.
2.Block the Entire Island
This is the most time-consuming but permanent step. Cover every single tile of grass, dirt, and sand soil on your island—except your planned rock spawn points—with the transparent design path.
3.Set Up the Hitting Environment
Behind each planned spawn point (opposite where you'll stand to hit), dig holes or place furniture (like a Stone Stool). This prevents you from being knocked back, ensuring you get all 8 hits.
4.Wait for Respawning
Only one new rock spawns per day. After 6 consecutive days, all rocks will have grown in your perfectly arranged Rock Garden.
Tip: Rocks cannot spawn on tiles with patterns, custom paths (sand, brick, etc.), or directly adjacent to the island's edge or buildings.
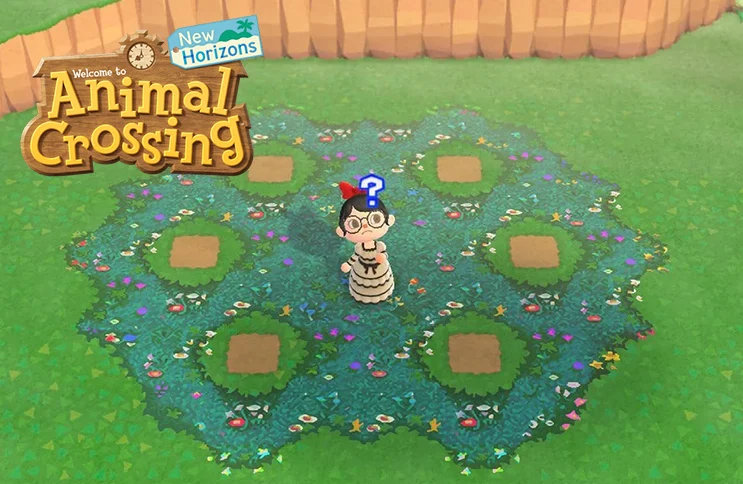
2. Fixing Fossil Spawns (Precision Digging)
Principle: Four fossil dig spots spawn on your island daily (three initially). By covering most of the ground, you can funnel them to a specific area, ending the daily scavenger hunt for "X" marks.
Steps:
1.Collect Today's Fossils
Ensure you've already dug up and assessed all 4 fossils for the day.
2.Plan Your Dig Site
Select an open patch of grass to be your dedicated "excavation zone."
3.Cover Everything Else
Just like with the rocks, cover all other spawnable grass and dirt areas on your island with the transparent custom path, leaving only your dig site ground exposed.
4.Collect Tomorrow
The next day after loading your game, all 4 fossil "X" marks will appear neatly within your designated zone.
Note: Fossils won't spawn under flowers, furniture, buildings, on the beach, or on non-transparent paths. This method also works to control the daily glowing money spot.
3. "Fixing" Furniture Trees (The Safe & Efficient Shaking Method)
Principle: Daily, 2 of your non-fruit trees (Hardwood or Cedar) will each drop one piece of furniture. By precisely controlling the total number of standard trees, you can make shaking for furniture and wasp nests a completely predictable and safe routine.
Steps:
1.Reduce Tree Count
Remove or chop down all standard trees you don't want to shake. Your final goal is to have exactly 7 standard trees on your entire main island.
Why 7? Daily fixed drops are: 2 furniture items + 5 wasp nests. 7 trees perfectly correspond to these 7 guaranteed drops, eliminating randomness.
2.Plant Them Together
Plant these 7 trees close together in a convenient area, like near your home or the plaza.
3.Prepare a Safe Zone
Before shaking, clear the 3x3 area in front of each tree of any items so drops are visible. Always hold a net, stand directly in front of the tree, and shake. If a wasp nest falls, press A immediately to catch them.
4.Daily Harvest
Shake these 7 trees every day. You will always get 2 furniture items and 5 wasp nests (which can be sold), with no risk of missing anything or being surprised by bees.
Key: Fruit trees (including palm trees) do not drop furniture or wasps, so they don't interfere with this method.
4. Controlling the Message Bottle (Efficient Beach Patrol)
Principle: One message bottle containing a DIY recipe washes up on your main island's beach daily. Keeping the beach clean is key to guiding its spawn to a preferable location.
Steps:
1.Thoroughly Clean the Beach
Pick up all shells, star fragments, dropped items, and placed objects on the sand. This is crucial, as these items occupy spawn tiles.
2.Plan Your Patrol Route
Bottles tend to spawn on open sand. Keeping the central stretches of your beach clear makes it more likely for the bottle to appear along your usual route.
3.Collect the Next Day
The bottle will appear on your clean beach the next day. Note that traveling to mystery islands does not affect your main island's single daily bottle spawn.
Tip: Permanent beach decorations (like beach chairs, coconut trees) don't block spawns, but loose, placeable items do.
Recommended Daily Collection Route
Follow this order to collect all core resources in 10-15 minutes:
1.Dig Fossils & Plant Money Tree: Go to your fixed dig site, excavate the 4 fossils. Find the glowing money spot, bury a bag of bells (10,000 bells is recommended for a 30,000-bell return in 3 days).
2.Hit Rocks: Go to your Rock Garden, use a vaulting pole or ladder to enter, and efficiently hit all 6 rocks for materials.
3.Shake Trees for Furniture & Wasps: Go to your cluster of 7 trees, net in hand, shake them to get 2 furniture pieces and catch 5 wasps.
4.Grab the Message Bottle: Finally, patrol your beach to pick up the daily DIY bottle.
After this routine, you're free to focus on island decorating, fishing, bug catching, or simply relaxing!
ACNH Resource FAQ
Q1: Are these "fixed" layouts permanent? What if I want to change my layout later?
They are persistent, but easily reversible. Simply perform the inverse action. For example, to move your Rock Garden, eat fruit and smash the current rocks, then remove the transparent paths from your new desired location. The rocks will respawn there. The same logic applies to other resources—remove the path blocks, and spawns become random again.
Q2: Will implementing these techniques affect my island evaluation?
Important Note: Placing a large number of transparent custom designs is counted by the game as "clutter." This can lower your island star rating (preventing you from reaching 5 stars) and consequently affect the spawning of Lily of the Valley flowers. Best practice: Achieve a 5-star island and obtain the Golden Watering Can recipe before fully implementing these fixed layouts.
Q3: Why exactly 7 trees? Can't I keep more?
It's about turning chance into certainty. With more than 7 trees, the furniture and wasp nest drops become randomized among them. You'd have to shake many more trees to find everything, and you couldn't predict which tree holds wasps, increasing risk. Seven is the perfect balance of efficiency and safety.
Conclusion
Mastering these four fixed-point techniques means you have complete control over your island's daily resource spawns. It drastically reduces the time spent on daily "search and collect" chores, freeing you to focus entirely on creative design and leisurely play. Start planning your efficient island layout today and enjoy a perfectly organized Animal Crossing life!

